Builder gel is quickly becoming a favorite in the world of nail enhancements, and for good reason. If you dream of having long, strong, and perfectly shaped nails that last for weeks, this product might be your new best friend. Unlike regular gel polish, builder gel has a thicker consistency that allows you to build length and add strength to your natural nails. It offers a durable and flexible overlay that can protect your nails from breaking and splitting.
This guide will walk you through everything you need to know about builder gel. We’ll cover what it is, how it differs from other nail products, and the benefits of using it. You’ll also learn about the application process, how to maintain your beautiful new nails, and how to safely remove the gel when you’re ready for a change. Get ready to explore the durable, versatile, and beautiful world of builder gel.
Key Takeaways
- Strength and Durability: Builder gel adds significant strength to natural nails, making them less prone to breakage and allowing them to grow longer.
- Versatility: It can be used as an overlay on natural nails, to create extensions using tips or forms, and to encapsulate nail art.
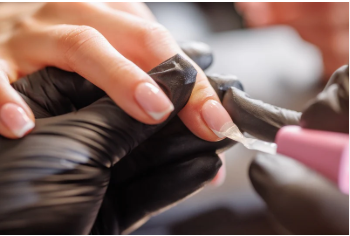
- Application Process: Proper application involves nail preparation, applying a base coat, building the nail structure with builder gel, curing under a UV/LED lamp, and finishing with a top coat.
- Maintenance: With proper care, builder gel manicures can last 3-4 weeks. Infills are required to maintain the look as your natural nails grow.
Understanding Builder Gel: What Sets It Apart?
Builder gel is a type of gel product used to create thickness, length, and strength on natural nails or to create nail extensions. Its viscosity is much thicker than standard gel polish, which gives it the ability to be ‘built up’ to create a desired shape and apex. The apex is the highest point of the nail enhancement, which provides structural support and makes the nail look more natural and elegant. This unique consistency is what makes builder gel so effective for nail strengthening and sculpting.
One of the key features of builder gel is its self-leveling property. This means that once applied, the gel will smooth itself out, creating an even surface that requires minimal filing and shaping. This characteristic helps nail technicians and DIY enthusiasts achieve a professional finish more easily. When cured under a UV or LED lamp, the gel hardens into a strong yet flexible coating that protects the nail underneath. This makes it an ideal solution for individuals with weak, brittle, or peeling nails who struggle to grow them out naturally.
Builder Gel vs. Acrylics: What’s the Difference?
When choosing a nail enhancement, many people weigh the options between builder gel and acrylics. While both can create long, strong nails, they are very different in their chemical composition, application process, and feel. Acrylic nails are created by mixing a liquid monomer and a powder polymer to form a paste that is molded onto the nail and air-dries. Builder gel, on the other hand, is a pre-mixed, gel-like substance that must be cured under a UV or LED light to harden.
The application process is a major point of difference. Acrylic application involves a strong chemical odor from the monomer, which can be off-putting for some. Builder gel is odorless, making the experience more pleasant. In terms of feel, many users find that builder gel nails are more flexible and have a more natural feel compared to the rigidity of acrylics. Removal also differs; acrylics are typically soaked off with acetone, which can be drying to the nails and skin. While some builder gels can be soaked off, hard gels often require filing, which should be done by a professional to avoid damaging the natural nail.
Builder Gel vs. Soft Gel (Soak-Off Gel)
You might be wondering how builder gel differs from the soft gel polish used in typical gel manicures. The main difference lies in their viscosity and purpose. Soft gel, or soak-off gel polish, has a thin consistency similar to regular nail polish. It’s designed to provide a long-lasting color coat over the natural nail but offers minimal added strength. It is easily removed by soaking in acetone.
Builder gel is much thicker and is designed for structural purposes. It can add an apex and create length, something soft gel cannot do. Think of soft gel as paint for your walls and builder gel as the plaster that smooths and strengthens the wall itself. Because of its strength, builder gel is the go-to product for creating extensions and providing a robust overlay for weak nails. While some builder gels are soak-off, many are “hard gels,” meaning they are not porous and cannot be removed with acetone. These hard gels must be filed off.
The Amazing Benefits of Using Builder Gel
Choosing builder gel for your manicure comes with a host of advantages. Its unique properties make it a superior choice for anyone looking to improve the health and appearance of their nails. From enhanced durability to a beautiful, natural finish, the benefits are clear.
Adds Impressive Strength and Durability
The primary benefit of using builder gel is the incredible strength it provides. If your nails are prone to breaking, peeling, or splitting, a builder gel overlay acts as a protective shield. This durable coating absorbs daily impacts, preventing damage to the natural nail underneath. This protection allows your nails to grow longer and stronger than they ever could on their own. The added thickness creates a resilient structure that can withstand the rigors of daily life, making chipped or broken nails a thing of the past.
Promotes Natural Nail Growth
For those who dream of long, natural nails but can never seem to achieve them, builder gel can be a game-changer. By providing a strong, protective layer, it prevents the common issues that hinder nail growth. The gel moves with the natural nail, offering flexibility that prevents it from snapping under pressure. With regular infills, you can continue to grow your natural nails to your desired length, all while they are safely tucked under the protective gel layer. It’s a supportive solution that helps you reach your nail goals.
Achieves a Natural, Flawless Look
Despite its strength, builder gel provides a remarkably natural-looking finish. When applied correctly, it creates a smooth, sleek surface that mimics the appearance of healthy, strong nails. The ability to sculpt the gel allows a nail technician to create a perfect shape and apex, resulting in an elegant and refined look. Unlike some thicker enhancements, builder gel can be applied in thin layers for a subtle overlay or built up for more dramatic length, all while maintaining a lightweight feel. You can learn more about achieving fashionable looks on the truefashionstory.com Blog.
Your Guide to Applying Builder Gel
The application of builder gel is a multi-step process that requires precision and the right tools. Whether you’re visiting a salon or trying it at home, understanding the steps is key to a flawless and long-lasting manicure.
Step 1: Nail Preparation is Key
Proper preparation is the foundation of any successful nail enhancement. This step ensures the builder gel will adhere correctly and last for weeks.
- Sanitize: Start by washing your hands and nails thoroughly.
- Cuticle Care: Gently push back your cuticles. Carefully trim any excess dead skin, but avoid cutting the living tissue of the eponychium.
- Shape and Buff: File your nails to your desired shape. Then, lightly buff the entire surface of the nail plate with a fine-grit buffer. This removes the natural shine and creates a slightly rough surface for the gel to grip.
- Dehydrate and Prime: Wipe the nails with a lint-free wipe soaked in nail dehydrator or 99% isopropyl alcohol to remove all dust and oils. Follow this with a thin layer of nail primer, which acts as a double-sided tape between your natural nail and the gel.
Step 2: Applying the Base and Builder Gel
With your nails prepped, it’s time to start applying the gel.
- Base Coat: Apply a thin, even layer of a gel base coat. Be careful not to get it on your skin. Cure the base coat under your UV/LED lamp according to the product’s instructions (typically 30-60 seconds).
- Building the Nail: Apply a layer of builder gel. If you’re doing a simple overlay, this will be a “slip layer.” If you’re building an apex or extension, you’ll place a larger bead of gel in the center of the nail and gently guide it into place, allowing it to self-level. Work on one nail at a time.
- Curing the Builder Gel: Cure the builder gel layer under the lamp. The curing time will be longer for builder gel, often 60-90 seconds, depending on the lamp and the gel’s thickness.
Step 3: Shaping and Finishing Touches
After curing, the nail will be strong but may need some refinement.
- Wipe the Inhibition Layer: The gel will have a sticky layer on top after curing, known as the inhibition layer. Wipe this off with a lint-free wipe and isopropyl alcohol.
- File and Shape: Use a 180-grit file to refine the shape and smooth the surface of the nail. Pay attention to the side walls and the cuticle area to ensure a seamless blend.
- Buff: Buff the nail smooth to remove any file marks.
- Top Coat: After removing all dust, apply a thin layer of gel top coat. This will seal the builder gel, add a high-gloss shine, and protect it from scratches. Cure the top coat for the recommended time, and you’re done!
Maintaining Your Builder Gel Manicure
A builder gel manicure can last 3-4 weeks with proper care. To keep your nails looking their best, you’ll need “infills” or “rebalancing” appointments. As your natural nail grows, a gap will appear at the cuticle area. During an infill, a technician will file down the existing gel, fill the gap with new builder gel, and re-shape the nail. This maintains the structural integrity and appearance of the manicure.
At home, you can prolong the life of your manicure by wearing gloves when cleaning or washing dishes and by applying cuticle oil daily. This keeps your cuticles and the surrounding skin hydrated, which contributes to overall nail health. Avoid using your nails as tools to open cans or scrape things, as this can cause lifting or breaking.
How to Safely Remove Builder Gel
Safe removal is crucial to protect your natural nails. The method depends on whether you have a soak-off builder gel or a hard gel.
- Soak-Off Builder Gel: The removal process is similar to soft gel polish. The top coat is filed off, and the nails are soaked in acetone.
- Hard Builder Gel: This type of gel is non-porous and must be filed off. It is highly recommended that this be done by a trained nail technician. They use an e-file to carefully remove the bulk of the product, leaving a thin layer behind to protect the natural nail. Improper filing can quickly lead to severe damage to your nail plate.
Comparison: Builder Gel vs. Other Nail Enhancements
|
Feature |
Builder Gel |
Acrylic |
Dip Powder |
|---|---|---|---|
|
Application |
Cured with UV/LED light; odorless. |
Monomer and polymer mix; strong odor. |
Applied with resin and powder layers. |
|
Durability |
Strong and flexible. |
Very strong but rigid. |
Strong and durable, but can be brittle. |
|
Flexibility |
More flexible, natural feel. |
Rigid, less natural feel. |
Rigid, feels thick on the nail. |
|
Removal |
Hard gel is filed off; some are soak-off. |
Soaked off with acetone. |
Soaked off with acetone. |
|
Best For |
Strengthening natural nails, creating extensions. |
Long, dramatic extensions. |
Strength and color on natural nails. |
Frequently Asked Questions (FAQ)
Q1: Can builder gel damage my natural nails?
A1: When applied and removed correctly by a trained professional, builder gel should not damage your natural nails. In fact, it can help protect them and allow them to grow. Damage typically occurs from improper removal, such as picking or peeling off the gel, or overly aggressive filing.
Q2: How long does a builder gel manicure last?
A2: A builder gel manicure typically lasts between 3 to 4 weeks. After this period, you will need an infill to fill the gap crescimento at the cuticle and rebalance the nail’s structure.
Q3: Can I apply builder gel at home?
A3: While it is possible to apply builder gel at home, there is a steep learning curve. The process requires specific tools, including a UV/LED lamp, and knowledge of nail anatomy and product application. For beginners, it’s recommended to visit a professional to ensure the best and safest results.
Q4: Can you use regular nail polish over builder gel?
A4: Yes, you can. After the builder gel is fully cured and shaped, you can apply regular nail polish on top. Just be sure to use a good base coat to prevent staining the gel. Alternatively, you can apply gel polish over the builder gel for a longer-lasting color finish.